Klark Teknik 76-KT Review: Can a £200 Compressor Actually Compete?

We review the Klark Teknik 76-KT and compare it to the Warm Audio WA76. Can a £200 compressor deliver classic 1176 tone? Full breakdown inside.

Future Sound Labs — The Tech Issue
ISSUE #005

If you're into compression and classic gear emulations, you already know the 1176 is a legendary beast. Fast attack, aggressive punch, unmistakable tone. But what if you could get that sound — or at least something close — for under £200?

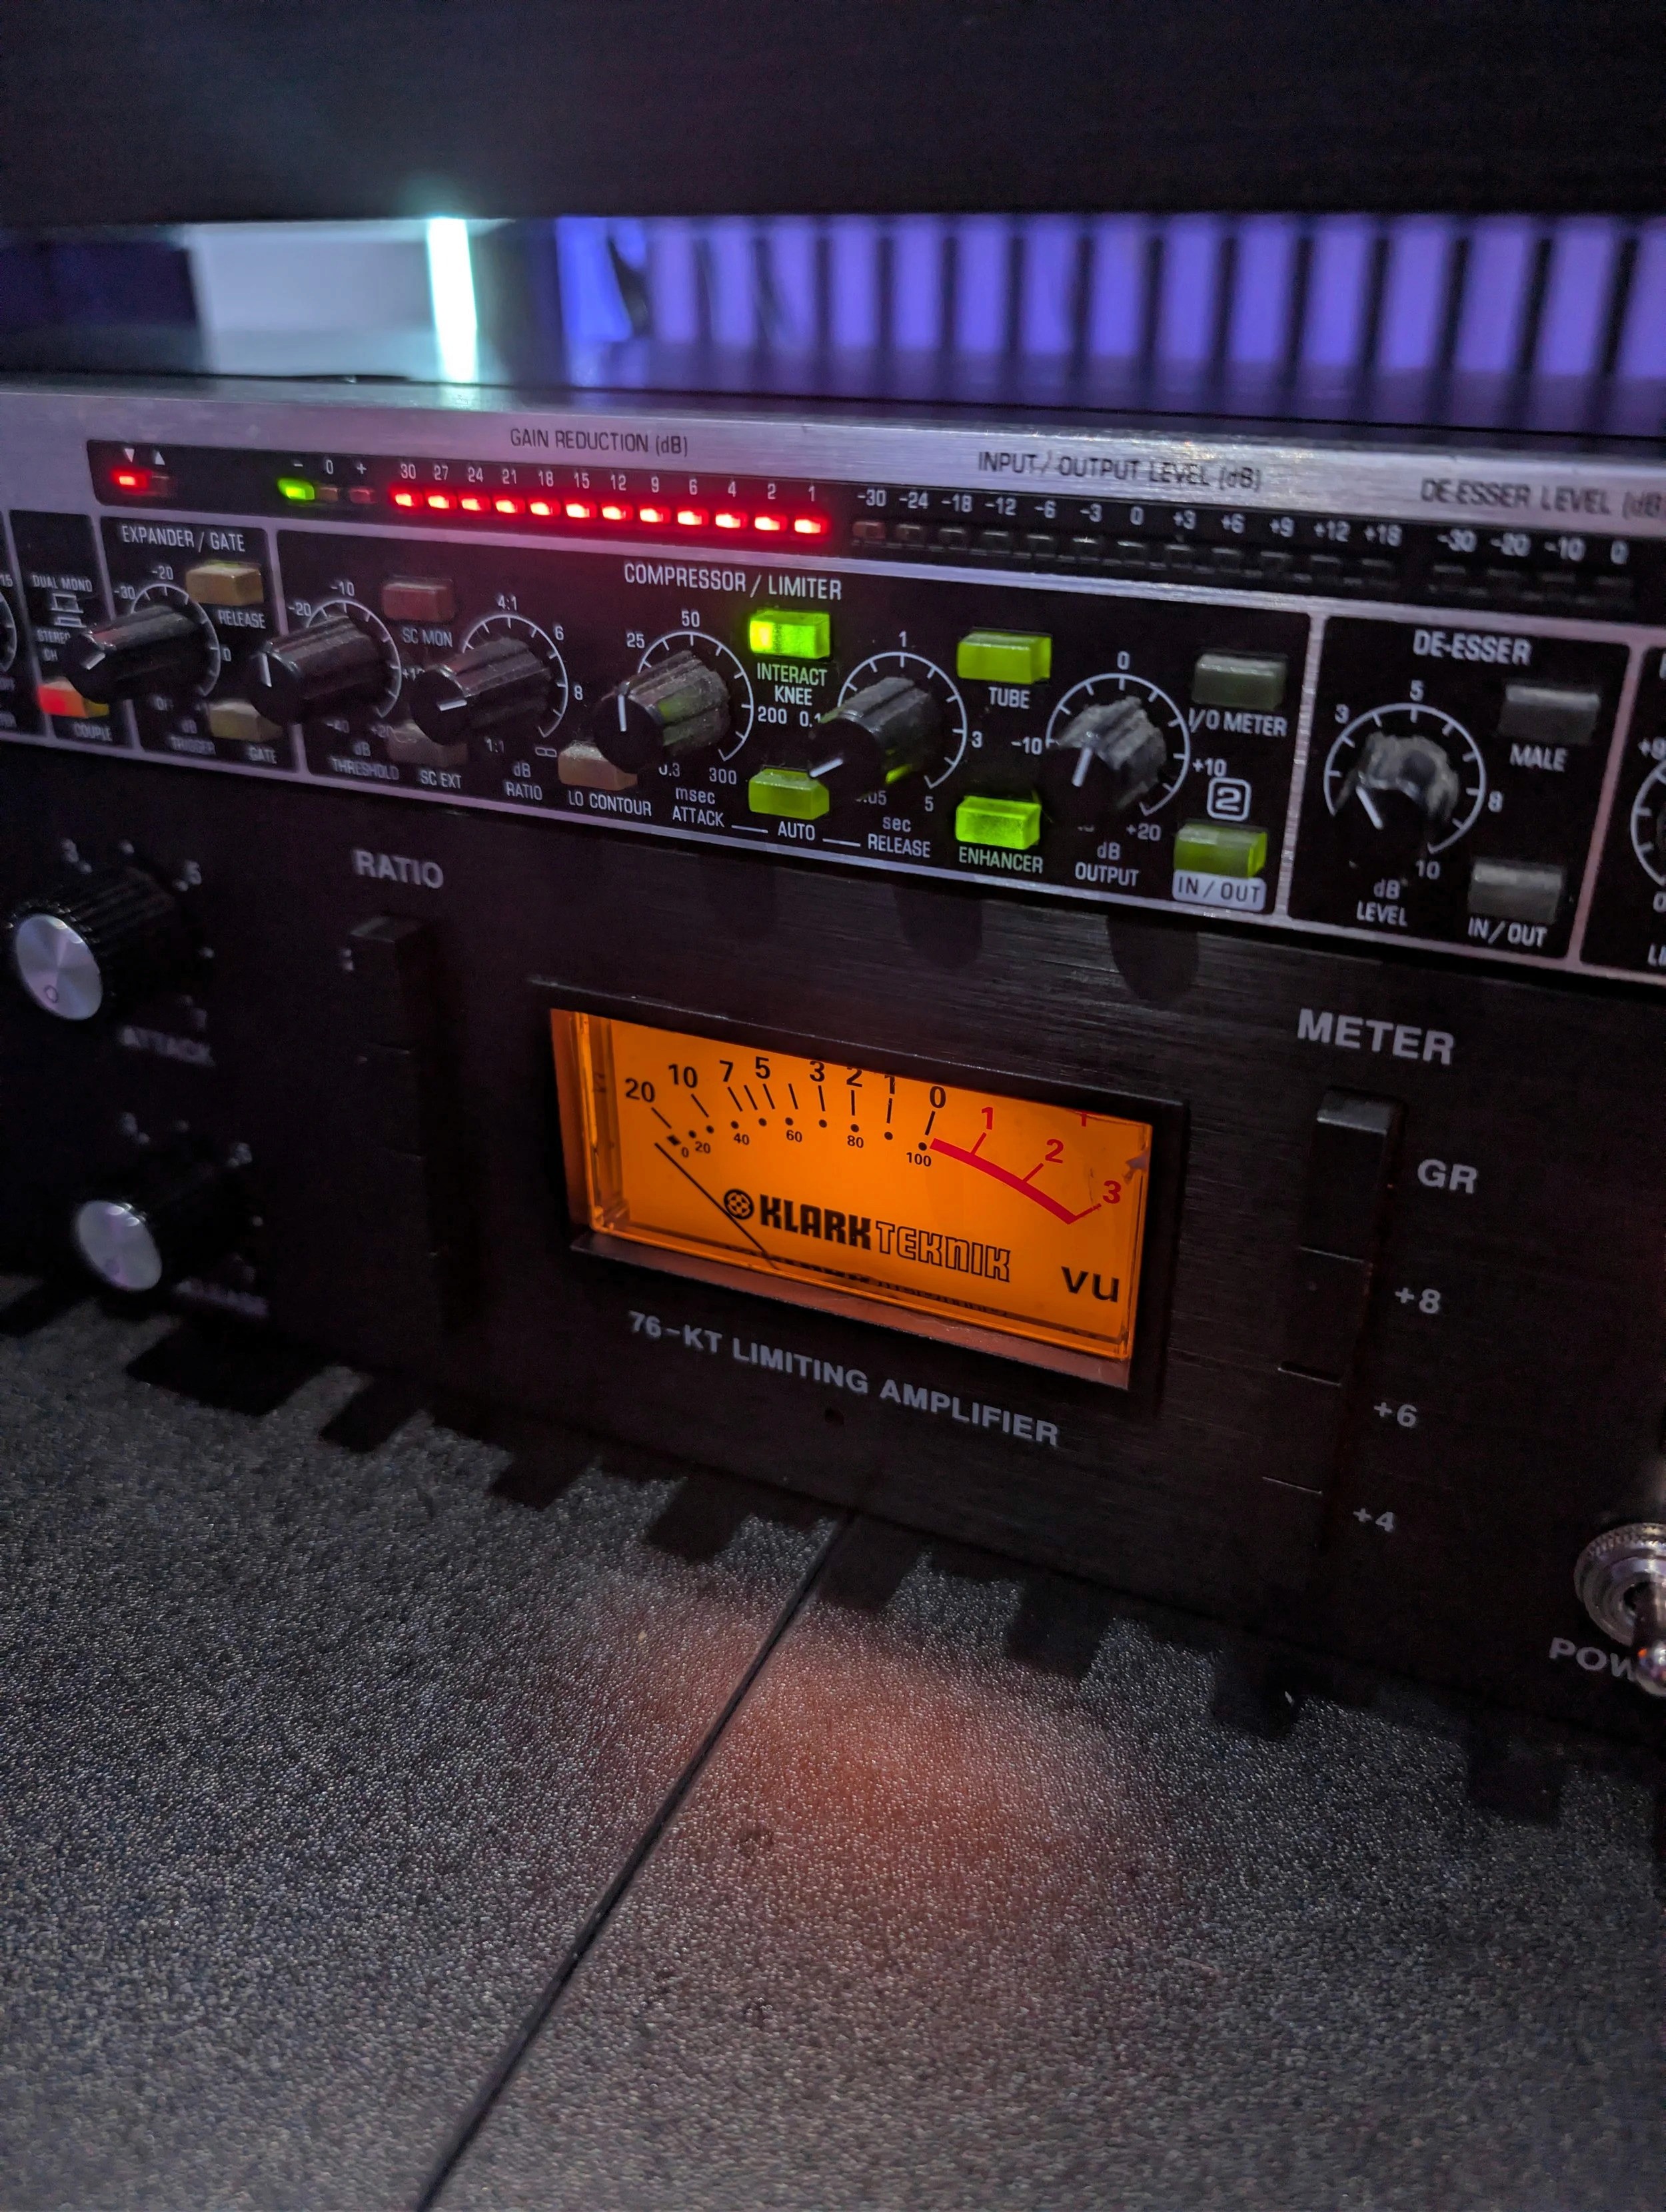
Enter the Klark Teknik 76-KT.

Let’s be real. At this price, your first reaction might be: “No way this holds up.” But after real-world testing against the Warm Audio WA76 and running it through some critical listening sessions, it turns out… the hype might actually be real.

Klark Teknik 76-KT.


“Let’s be real. At this price, your first reaction might be: “No way this holds up.”

First Impressions

  • Build Quality:
    Surprisingly solid. Metal casing, quality knobs, no plastic crap. It feels like studio gear — not a toy.

  • Controls:
    Same layout as the original 1176. Input, Output, Attack, Release, Ratio — all familiar. But unlike the Warm, the knobs aren’t stepped, which some producers actually prefer for fine-tuning.

  • Visuals:
    Classic VU meter with switchable modes. It looks great in a rack and doesn’t scream "budget."

Sound + Tone

We A/B tested it next to the Warm Audio WA76 on vocals, and here’s what stood out:

Klark Teknik 76-KT

  • Lets more transient through — smoother, less grabby

  • Sounds rounder and warmer, especially on low-end

  • Slightly more forgiving — perfect for vocals, bass, and synths

Warm Audio WA76

  • Snappier and more aggressive

  • Tighter compression, especially on drums

  • Adds a bit of brightness in the mids and upper-mids

Neither is objectively better — just different tools. The KT-76 is a bit slower and more mellow; the WA76 is harder and faster.

Real Talk: Why It Works

The 76-KT might not technically nail every detail of a vintage 1176, but here’s what it does do well:

  • Gives you that analog character, vibe, and responsiveness that plugins struggle to match

  • Inspires better performances — hands-on compression while tracking makes a difference

  • Sounds fat and musical, especially for the price

Where It Shines

Vocals – Smooth, forgiving, and full
Synths – Adds warmth without killing transients
Bass – Keeps dynamics in check without flattening it
Live recording chains – Works well as a front-end compressor with an audio interface

Any Downsides?

  • Not a surgical tool — the attack/release are looser than some high-end 1176s

  • Meter can drift slightly under heavy use (common in this price range)

  • Some may find it too subtle if they're expecting aggressive slam like a true UREI

Final Verdict

For under £200? It's a no-brainer.

The Klark Teknik 76-KT isn’t just “good for the price” — it’s actually good. It brings 80–90% of the 1176 vibe into your home studio for the same price as a plugin bundle.

If you're a bedroom producer, small studio owner, or just starting to build your outboard rack, this is one of the best compressors you can get without draining your budget.

Better than plugins?
Sometimes, yeah. Especially if you're chasing that feel.
Better than Warm Audio?
Different. Some preferred the KT-76 on vocals, others leaned toward Warm for drums.

At the end of the day, gear like this proves you don’t need a £2,000 budget to get pro sound.

Editor’s Pick:

Future Sound Academy recommends the 76-KT as part of your first outboard chain — paired with a clean preamp, it's a killer vocal chain for under £500 total.

Got one already? Let us know how you’re using it.
Want help building your analog chain?
Join a 1-on-1 session at our Warrington studio. Or sign up for our upcoming online production courses.

Featured Blog Posts

Image

Apr 7, 2026

How to Build a Professional Serum Preset

The fastest way to build a professional Serum preset is to start with a clear sound goal, choose the right wavetables, shape your oscillators, and refine the patch using envelopes, filters, effects, and modulation. This guide shows each step so producers at any level can create polished, mix-ready sounds. 1. Define the Sound Before You Start Professional sound design begins with intention. Decide whether your preset will be: • A bass • A lead • A pad • A pluck • A chord • A texture or special effect Real world example At Future Sound Academy, students make cleaner presets by first naming the type of sound before touching any controls. 2. Choose the Right Wavetable Wavetables determine 80 percent of the character. Professional choices • Analog wavetables for warm basses and leads • Modern digital wavetables for aggressive EDM sounds • Formant and vocal wavetables for talking and textured tones • Custom wavetables for signature sounds Tip Avoid starting with overly complex wavetables. Simpler ones often shape more effectively. 3. Shape the Oscillators Key adjustments include: • Unison • Detune • Blend • Warp modes such as FM, Bend, Sync, and Mirror What pros do They focus on subtle changes instead of pushing controls too far. Small adjustments result in cleaner, wider, and mix-ready sounds. 4. Build a Strong Envelope Structure Envelopes shape movement and punch. For bass • Fast attack • Short decay • No sustain • Fast release For leads • Medium attack • Medium sustain • Slight release For pads • Slow attack • Long release Tip Envelope one controls volume by default. Create movement by applying envelopes two or three to pitch, wavetable position, or cutoff. 5. Use the Filter for Tone and Control Filters define presence and warmth. Best filter types • Low pass for smooth basses and leads • High pass for airy pads • Band pass for textured mids • Notch filters for movement and character Add drive for thickness and analog feel. 6. Add Modulation for Life and Movement Modulation makes a preset feel alive. Useful targets • Wavetable position • Filter cutoff • Oscillator warp • Noise volume • Effects parameters Advanced tip Use small amounts of random modulation to create natural variation without sounding chaotic. 7. Add Noise and Sub for Weight Noise Adds texture and realism. Use subtle amounts. Sub oscillator Essential for bass presets. Route it directly to the output for clean, consistent low end. 8. Use the FX Section Professionally A polished Serum preset almost always uses effects. Essential effects • Distortion for bite • Multiband compression for loud modern tone • Reverb for width • Delay for movement • EQ for shaping Pro workflow Keep FX subtle. Overprocessing creates muddy presets. 9. Macros for User Control A professional preset always includes macros. Useful macro assignments • Filter open • Distortion amount • Reverb level • Wavetable movement • Sub level Macros make the preset more usable and more valuable in a pack. 10. Level the Patch and Test in a Mix Final steps • Adjust oscillator levels • Balance FX • Avoid clipping • Test your preset inside a real project At Future Sound Academy, producers test each patch in a track to ensure it cuts through the mix without overpowering it. Summary To build a professional Serum preset: Define the sound Pick the right wavetable Shape oscillators Build envelopes Use filters Add modulation Add sub and noise Use FX professionally Assign macros Test in a mix Follow these steps and your presets will sound polished, purposeful, and ready for release or inclusion in sound packs.

Image

Apr 3, 2026

How to Make Melodic House & Techno (Step-by-Step)

To make melodic house and techno, you need a strong emotional chord progression, a driving groove, atmospheric layers, and clean, controlled low end. This guide walks you through the full process from idea to finished track using techniques taught at Future Sound Academy. What Defines Melodic House & Techno Melodic house and techno combines rhythm with emotion. The key elements are: Deep, rolling basslines Emotional chord progressions Atmospheric pads and textures Clean, minimal drums Gradual arrangement and energy build Artists in this space focus on feeling, movement, and space, not just drops. Step 1: Start With a Chord Progression Everything begins with harmony. How to do it: Choose a key, often minor for emotional tone Use simple triads or seventh chords Keep progressions repetitive but evolving Example progression: Am – F – C – G Real-world tip: At Future Sound Academy, students often start with a piano or soft pad to sketch ideas before choosing final sounds. Step 2: Build a Driving Drum Groove The groove is the foundation. Core elements: Kick on every beat Closed hi-hats with subtle swing Percussion loops for movement Occasional open hats for energy Pro tip: Keep drums simple. Space is key in melodic genres. Step 3: Create a Rolling Bassline Your bass should support both rhythm and harmony. How to build it: Follow root notes of your chords Use off-beat or rolling patterns Keep sub clean and controlled Processing tips: Use sidechain compression with the kick Add light saturation for presence Keep everything below 120 Hz mono Step 4: Design the Lead or Hook This is the emotional centre of your track. Options include: Pluck synths Arpeggiated sequences Vocal chops Analog-style leads How to make it stand out: Add delay and reverb Automate filter cutoff Layer with subtle harmonies Step 5: Add Atmosphere and Texture Melodic techno is known for space and depth. Use: Pads Field recordings Noise textures Reversed sounds Example: A filtered white noise riser can slowly build tension into a drop. Step 6: Arrange the Track Properly Structure is key to keeping listeners engaged. Typical arrangement: Intro with drums and atmosphere Build with added elements First drop with bass and lead Breakdown with chords and pads Second drop with full energy Outro for DJ mixing Tip: Automate filters, volume, and effects to keep the track evolving. Step 7: Mix for Clarity and Space Clean mixing is essential in this genre. Focus on: Clear separation between kick and bass Controlled low end Balanced mids Wide but clean highs Key techniques: EQ to remove mud Sidechain compression Subtle saturation Mid side EQ for width Step 8: Add Movement With Automation Static tracks feel lifeless. Automate: Filter cutoff Reverb size Delay feedback Volume levels Real-world example: At Future Sound Academy, students learn to automate small changes over time to keep tracks evolving without overcrowding them. Step 9: Reference and Test Your Track Compare your track with professional releases. Check: Low end balance Overall loudness Stereo width Energy flow Test on: Headphones Studio monitors Car speakers Phone speakers Final Summary To make melodic house and techno: Start with emotional chords Build a simple groove Add a rolling bassline Create a memorable lead Layer atmosphere and textures Arrange with flow and movement Mix clean and controlled Use automation for energy Reference and test your track Real-World Insight from Future Sound Academy Many students struggle by overcomplicating their tracks. The biggest improvement comes from simplifying the arrangement and focusing on strong core ideas rather than adding more sounds.

Image

Apr 7, 2026

How to Build a Professional Serum Preset

The fastest way to build a professional Serum preset is to start with a clear sound goal, choose the right wavetables, shape your oscillators, and refine the patch using envelopes, filters, effects, and modulation. This guide shows each step so producers at any level can create polished, mix-ready sounds. 1. Define the Sound Before You Start Professional sound design begins with intention. Decide whether your preset will be: • A bass • A lead • A pad • A pluck • A chord • A texture or special effect Real world example At Future Sound Academy, students make cleaner presets by first naming the type of sound before touching any controls. 2. Choose the Right Wavetable Wavetables determine 80 percent of the character. Professional choices • Analog wavetables for warm basses and leads • Modern digital wavetables for aggressive EDM sounds • Formant and vocal wavetables for talking and textured tones • Custom wavetables for signature sounds Tip Avoid starting with overly complex wavetables. Simpler ones often shape more effectively. 3. Shape the Oscillators Key adjustments include: • Unison • Detune • Blend • Warp modes such as FM, Bend, Sync, and Mirror What pros do They focus on subtle changes instead of pushing controls too far. Small adjustments result in cleaner, wider, and mix-ready sounds. 4. Build a Strong Envelope Structure Envelopes shape movement and punch. For bass • Fast attack • Short decay • No sustain • Fast release For leads • Medium attack • Medium sustain • Slight release For pads • Slow attack • Long release Tip Envelope one controls volume by default. Create movement by applying envelopes two or three to pitch, wavetable position, or cutoff. 5. Use the Filter for Tone and Control Filters define presence and warmth. Best filter types • Low pass for smooth basses and leads • High pass for airy pads • Band pass for textured mids • Notch filters for movement and character Add drive for thickness and analog feel. 6. Add Modulation for Life and Movement Modulation makes a preset feel alive. Useful targets • Wavetable position • Filter cutoff • Oscillator warp • Noise volume • Effects parameters Advanced tip Use small amounts of random modulation to create natural variation without sounding chaotic. 7. Add Noise and Sub for Weight Noise Adds texture and realism. Use subtle amounts. Sub oscillator Essential for bass presets. Route it directly to the output for clean, consistent low end. 8. Use the FX Section Professionally A polished Serum preset almost always uses effects. Essential effects • Distortion for bite • Multiband compression for loud modern tone • Reverb for width • Delay for movement • EQ for shaping Pro workflow Keep FX subtle. Overprocessing creates muddy presets. 9. Macros for User Control A professional preset always includes macros. Useful macro assignments • Filter open • Distortion amount • Reverb level • Wavetable movement • Sub level Macros make the preset more usable and more valuable in a pack. 10. Level the Patch and Test in a Mix Final steps • Adjust oscillator levels • Balance FX • Avoid clipping • Test your preset inside a real project At Future Sound Academy, producers test each patch in a track to ensure it cuts through the mix without overpowering it. Summary To build a professional Serum preset: Define the sound Pick the right wavetable Shape oscillators Build envelopes Use filters Add modulation Add sub and noise Use FX professionally Assign macros Test in a mix Follow these steps and your presets will sound polished, purposeful, and ready for release or inclusion in sound packs.

Image

Apr 3, 2026

How to Make Melodic House & Techno (Step-by-Step)

To make melodic house and techno, you need a strong emotional chord progression, a driving groove, atmospheric layers, and clean, controlled low end. This guide walks you through the full process from idea to finished track using techniques taught at Future Sound Academy. What Defines Melodic House & Techno Melodic house and techno combines rhythm with emotion. The key elements are: Deep, rolling basslines Emotional chord progressions Atmospheric pads and textures Clean, minimal drums Gradual arrangement and energy build Artists in this space focus on feeling, movement, and space, not just drops. Step 1: Start With a Chord Progression Everything begins with harmony. How to do it: Choose a key, often minor for emotional tone Use simple triads or seventh chords Keep progressions repetitive but evolving Example progression: Am – F – C – G Real-world tip: At Future Sound Academy, students often start with a piano or soft pad to sketch ideas before choosing final sounds. Step 2: Build a Driving Drum Groove The groove is the foundation. Core elements: Kick on every beat Closed hi-hats with subtle swing Percussion loops for movement Occasional open hats for energy Pro tip: Keep drums simple. Space is key in melodic genres. Step 3: Create a Rolling Bassline Your bass should support both rhythm and harmony. How to build it: Follow root notes of your chords Use off-beat or rolling patterns Keep sub clean and controlled Processing tips: Use sidechain compression with the kick Add light saturation for presence Keep everything below 120 Hz mono Step 4: Design the Lead or Hook This is the emotional centre of your track. Options include: Pluck synths Arpeggiated sequences Vocal chops Analog-style leads How to make it stand out: Add delay and reverb Automate filter cutoff Layer with subtle harmonies Step 5: Add Atmosphere and Texture Melodic techno is known for space and depth. Use: Pads Field recordings Noise textures Reversed sounds Example: A filtered white noise riser can slowly build tension into a drop. Step 6: Arrange the Track Properly Structure is key to keeping listeners engaged. Typical arrangement: Intro with drums and atmosphere Build with added elements First drop with bass and lead Breakdown with chords and pads Second drop with full energy Outro for DJ mixing Tip: Automate filters, volume, and effects to keep the track evolving. Step 7: Mix for Clarity and Space Clean mixing is essential in this genre. Focus on: Clear separation between kick and bass Controlled low end Balanced mids Wide but clean highs Key techniques: EQ to remove mud Sidechain compression Subtle saturation Mid side EQ for width Step 8: Add Movement With Automation Static tracks feel lifeless. Automate: Filter cutoff Reverb size Delay feedback Volume levels Real-world example: At Future Sound Academy, students learn to automate small changes over time to keep tracks evolving without overcrowding them. Step 9: Reference and Test Your Track Compare your track with professional releases. Check: Low end balance Overall loudness Stereo width Energy flow Test on: Headphones Studio monitors Car speakers Phone speakers Final Summary To make melodic house and techno: Start with emotional chords Build a simple groove Add a rolling bassline Create a memorable lead Layer atmosphere and textures Arrange with flow and movement Mix clean and controlled Use automation for energy Reference and test your track Real-World Insight from Future Sound Academy Many students struggle by overcomplicating their tracks. The biggest improvement comes from simplifying the arrangement and focusing on strong core ideas rather than adding more sounds.

Image

Apr 7, 2026

How to Build a Professional Serum Preset

The fastest way to build a professional Serum preset is to start with a clear sound goal, choose the right wavetables, shape your oscillators, and refine the patch using envelopes, filters, effects, and modulation. This guide shows each step so producers at any level can create polished, mix-ready sounds. 1. Define the Sound Before You Start Professional sound design begins with intention. Decide whether your preset will be: • A bass • A lead • A pad • A pluck • A chord • A texture or special effect Real world example At Future Sound Academy, students make cleaner presets by first naming the type of sound before touching any controls. 2. Choose the Right Wavetable Wavetables determine 80 percent of the character. Professional choices • Analog wavetables for warm basses and leads • Modern digital wavetables for aggressive EDM sounds • Formant and vocal wavetables for talking and textured tones • Custom wavetables for signature sounds Tip Avoid starting with overly complex wavetables. Simpler ones often shape more effectively. 3. Shape the Oscillators Key adjustments include: • Unison • Detune • Blend • Warp modes such as FM, Bend, Sync, and Mirror What pros do They focus on subtle changes instead of pushing controls too far. Small adjustments result in cleaner, wider, and mix-ready sounds. 4. Build a Strong Envelope Structure Envelopes shape movement and punch. For bass • Fast attack • Short decay • No sustain • Fast release For leads • Medium attack • Medium sustain • Slight release For pads • Slow attack • Long release Tip Envelope one controls volume by default. Create movement by applying envelopes two or three to pitch, wavetable position, or cutoff. 5. Use the Filter for Tone and Control Filters define presence and warmth. Best filter types • Low pass for smooth basses and leads • High pass for airy pads • Band pass for textured mids • Notch filters for movement and character Add drive for thickness and analog feel. 6. Add Modulation for Life and Movement Modulation makes a preset feel alive. Useful targets • Wavetable position • Filter cutoff • Oscillator warp • Noise volume • Effects parameters Advanced tip Use small amounts of random modulation to create natural variation without sounding chaotic. 7. Add Noise and Sub for Weight Noise Adds texture and realism. Use subtle amounts. Sub oscillator Essential for bass presets. Route it directly to the output for clean, consistent low end. 8. Use the FX Section Professionally A polished Serum preset almost always uses effects. Essential effects • Distortion for bite • Multiband compression for loud modern tone • Reverb for width • Delay for movement • EQ for shaping Pro workflow Keep FX subtle. Overprocessing creates muddy presets. 9. Macros for User Control A professional preset always includes macros. Useful macro assignments • Filter open • Distortion amount • Reverb level • Wavetable movement • Sub level Macros make the preset more usable and more valuable in a pack. 10. Level the Patch and Test in a Mix Final steps • Adjust oscillator levels • Balance FX • Avoid clipping • Test your preset inside a real project At Future Sound Academy, producers test each patch in a track to ensure it cuts through the mix without overpowering it. Summary To build a professional Serum preset: Define the sound Pick the right wavetable Shape oscillators Build envelopes Use filters Add modulation Add sub and noise Use FX professionally Assign macros Test in a mix Follow these steps and your presets will sound polished, purposeful, and ready for release or inclusion in sound packs.

Image

Apr 3, 2026

How to Make Melodic House & Techno (Step-by-Step)

To make melodic house and techno, you need a strong emotional chord progression, a driving groove, atmospheric layers, and clean, controlled low end. This guide walks you through the full process from idea to finished track using techniques taught at Future Sound Academy. What Defines Melodic House & Techno Melodic house and techno combines rhythm with emotion. The key elements are: Deep, rolling basslines Emotional chord progressions Atmospheric pads and textures Clean, minimal drums Gradual arrangement and energy build Artists in this space focus on feeling, movement, and space, not just drops. Step 1: Start With a Chord Progression Everything begins with harmony. How to do it: Choose a key, often minor for emotional tone Use simple triads or seventh chords Keep progressions repetitive but evolving Example progression: Am – F – C – G Real-world tip: At Future Sound Academy, students often start with a piano or soft pad to sketch ideas before choosing final sounds. Step 2: Build a Driving Drum Groove The groove is the foundation. Core elements: Kick on every beat Closed hi-hats with subtle swing Percussion loops for movement Occasional open hats for energy Pro tip: Keep drums simple. Space is key in melodic genres. Step 3: Create a Rolling Bassline Your bass should support both rhythm and harmony. How to build it: Follow root notes of your chords Use off-beat or rolling patterns Keep sub clean and controlled Processing tips: Use sidechain compression with the kick Add light saturation for presence Keep everything below 120 Hz mono Step 4: Design the Lead or Hook This is the emotional centre of your track. Options include: Pluck synths Arpeggiated sequences Vocal chops Analog-style leads How to make it stand out: Add delay and reverb Automate filter cutoff Layer with subtle harmonies Step 5: Add Atmosphere and Texture Melodic techno is known for space and depth. Use: Pads Field recordings Noise textures Reversed sounds Example: A filtered white noise riser can slowly build tension into a drop. Step 6: Arrange the Track Properly Structure is key to keeping listeners engaged. Typical arrangement: Intro with drums and atmosphere Build with added elements First drop with bass and lead Breakdown with chords and pads Second drop with full energy Outro for DJ mixing Tip: Automate filters, volume, and effects to keep the track evolving. Step 7: Mix for Clarity and Space Clean mixing is essential in this genre. Focus on: Clear separation between kick and bass Controlled low end Balanced mids Wide but clean highs Key techniques: EQ to remove mud Sidechain compression Subtle saturation Mid side EQ for width Step 8: Add Movement With Automation Static tracks feel lifeless. Automate: Filter cutoff Reverb size Delay feedback Volume levels Real-world example: At Future Sound Academy, students learn to automate small changes over time to keep tracks evolving without overcrowding them. Step 9: Reference and Test Your Track Compare your track with professional releases. Check: Low end balance Overall loudness Stereo width Energy flow Test on: Headphones Studio monitors Car speakers Phone speakers Final Summary To make melodic house and techno: Start with emotional chords Build a simple groove Add a rolling bassline Create a memorable lead Layer atmosphere and textures Arrange with flow and movement Mix clean and controlled Use automation for energy Reference and test your track Real-World Insight from Future Sound Academy Many students struggle by overcomplicating their tracks. The biggest improvement comes from simplifying the arrangement and focusing on strong core ideas rather than adding more sounds.